Prerequisites for the Functioning of the email-oauth2-proxy Component
-
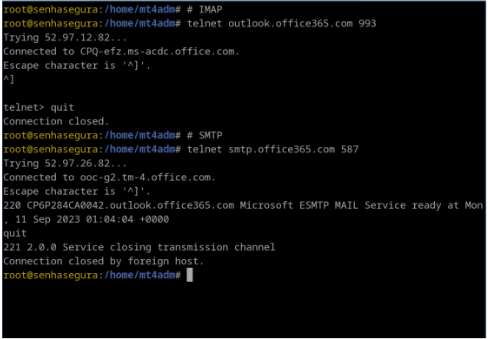
Telnet: 1. It is necessary to perform a Telnet test to check if there is a connection between the senhasegura vault and the Microsoft email server. This test is essential to ensure that communication between the systems is functioning correctly.
-
Enabling the SMTP Protocol in Microsoft Office 365: To configure the email-oauth2-proxy component in the senhasegura solution, you need to enable the SMTP protocol on the user’s email account. Follow the steps below to enable SMTP:
2.1 Access the Microsoft 365 admin center.
2.2 Select Users → Active Users.
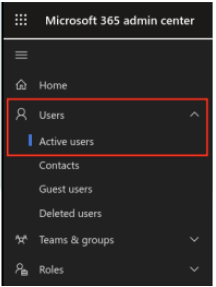
2.3 Select the user for whom you want to enable the protocol.
2.4 In the Mail options menu, select Manage email apps.
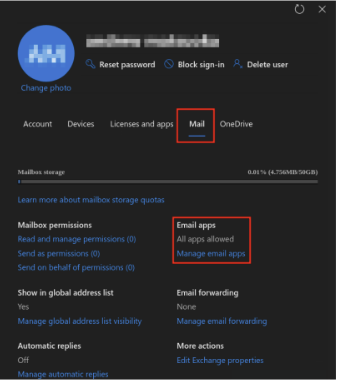
2.5 Check the Authenticated SMTP field.
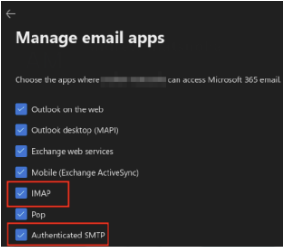
2.6 Click the Save changes button to apply the changes.
Following these steps, you will ensure that the SMTP service is properly enabled for the functioning of the email-oauth2-proxy component in the senhasegura solution.
Registering the Application
The registration process for the senhasegura solution follows the procedures defined by the service provider. Below is the link to register the senhasegura solution with the email provider and obtain the Tenant ID, Client ID, and Client Secret values:
Microsoft identity platform
-
Registering the Application
Registering the senhasegura solution establishes a trust relationship between the senhasegura solution and Microsoft’s identity platform. The trust is unidirectional: the senhasegura solution trusts Microsoft’s identity platform, and not the other way around. Once created, the senhasegura solution cannot be moved between different tenants.
Follow these steps to register the senhasegura solution:
1.1 Access the Azure portal.
1.2 Select Azure Active Directory.
1.3 In the Manage menu, select App registrations and then New registration.
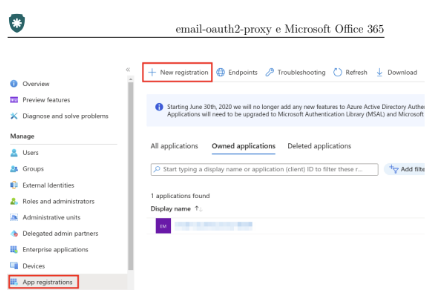
1.4 Fill in the fields Name, Supported account types, and Redirect URL.
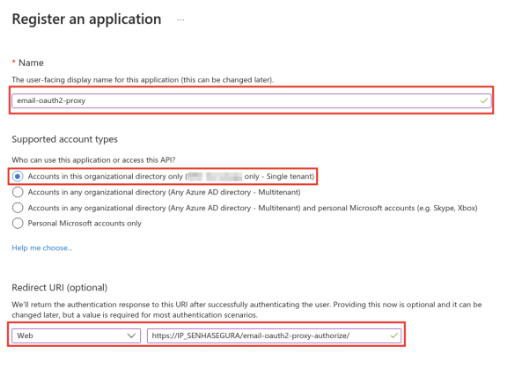
1.5 Click the Register button to save the operation. -
Creating Authorization Credentials
The credentials are used by the senhasegura solution to access the Microsoft Office 365 API. They allow the senhasegura solution to authenticate as itself without requiring user interaction at runtime.
2.1 In the Azure portal, under App registrations, select your application.
2.2 In the Certificates & secrets menu, select Client secrets and then New client secret.
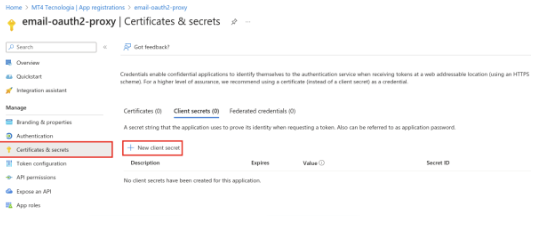
2.3 Fill in the fields Description and Expires.

2.4 Record the value of the Client Secret for use in the senhasegura solution code. This Client Secret is never shown again after you leave this page.
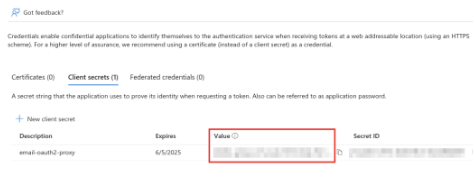
At this point, you should have the following information to configure the email-oauth2-proxy component in the senhasegura solution:
1.Client credentials (client_secret).
2.Application (client) ID (client_id).
3.Directory (tenant) ID (tenant_id).
As a final result, a window with the information regarding the credential created for the senhasegura application will be displayed. The responsible person should note the Client ID, Client Secret, and Tenant ID values, which will be used later to configure the email-oauth2-proxy component in the senhasegura solution.

Orbit
-
Help
You can get help on the orbit email-oauth2-proxy command by using orbit email-oauth2-proxy --help. This will provide detailed information about the command’s functionality. -
Configuring the email-oauth2-proxy Component
After obtaining the Client ID, Client Secret, and Tenant ID values, configure the email-oauth2-proxy component using the command below. Replace client-id, client-secret and tenant-id with the previously obtained values:

senhasegura
-
Configuring the SMTP Service in senhasegura
After the initial configuration of the email-oauth2-proxy component, the user must configure the SMTP service in the senhasegura solution. Follow these steps:
1.1 Open a browser and access the senhasegura solution.
1.2 Go to Settings → Notifications → SMTP Configuration.
1.3 Fill in the fields as indicated.
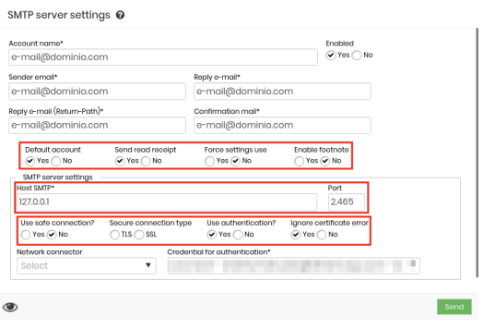
1.4 To save, select the Send button. -
Testing the SMTP Server
After configuring the SMTP, test the SMTP server using the Test Settings option on the SMTP Configuration screen. -
Obtaining the Authorization URL
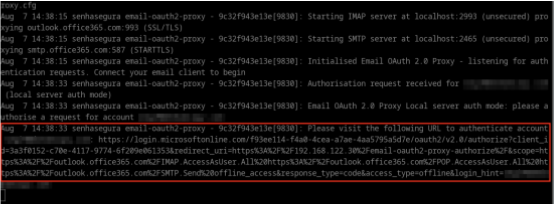
After configuring and testing the SMTP, run the following command on the terminal of the senhasegura solution to obtain the URL for authorizing the email-oauth2-proxy component with the Microsoft Office 365 API:
-
Authentication and Authorization Process
Follow these steps to authorize the email-oauth2-proxy component with the Microsoft Office 365 API:
4.1 Open a browser and paste the URL obtained in the previous step.
4.2 Log in to your Microsoft Office 365 account.
4.3 Follow the authentication and authorization process for the email-oauth2-proxy component.
4.4 Verify the final message that indicates a successful authorization process.

-
Configuring the IMAP Protocol
To configure the IMAP protocol in senhasegura with the email-oauth2-proxy component, follow these steps:
5.1 Access the senhasegura solution.
5.2 Go to Settings → Notifications → IMAP Configuration/POP3.
5.3 Click New to configure a new IMAP server.
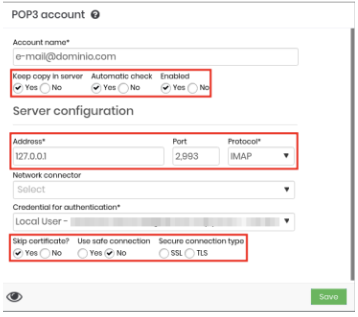
5.4 Enter the necessary server information and click Save.
By following these steps, you will have configured and authenticated the email-oauth2-proxy component in the senhasegura solution using the Microsoft Office 365 API, ensuring secure and efficient integration of functionalities.