Registering the Application
The registration process for the senhasegura solution follows the procedures defined by the service provider. Below is the link to register the senhasegura solution with the email provider and obtain the Client ID and Client Secret values:
Google OAuth 2.0 Guide
-
Enabling the Google Mail API: To register the senhasegura solution with Google Mail, you need to enable the Google Mail API. Follow these steps:
1.1 Access the Google API Console. - Google API Console.
1.2 Select the API you wish to enable, in this case, the Gmail API.
1.3 Click the “ENABLE” button to activate the API. -
Creating Authorization Credentials: To enable the senhasegura solution to use OAuth 2.0 to access Google APIs, you need to create authorization credentials that identify the application to Google’s OAuth 2.0 server. The following steps explain this process:
2.1 Access the Google Credentials Console.
2.2 Select the “Credentials” option.
2.3 Click on “CREATE CREDENTIALS”.
2.4 Select the “OAuth client ID” option.
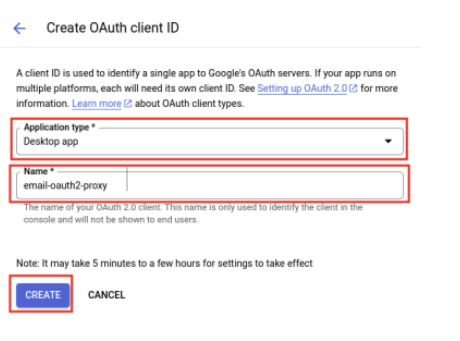
2.5 Choose “Desktop app” under the Application type and enter the application Name.
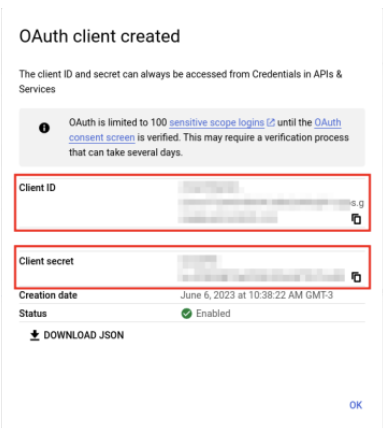
2.6 Note down the Client ID and Client Secret values displayed. These will be needed to configure the email-oauth2-proxy.
Orbit
-
- Configuring the email-oauth2-proxy Component: After obtaining the Client ID and Client Secret values, the next step is to configure the senhasegura solution, specifically the email-oauth2-proxy component. To do this, the
orbit email-oauth2-proxycommand will be used.
1.1 Open the terminal or command line.
1.2 For help, use the command orbit email-oauth2-proxy --help to understand the parameters better if necessary.

1.3 Use the command orbit email-oauth2-proxy to start the configuration.
1.4 Execute the command below, replacing the placeholders with the Client ID and Client Secret values obtained earlier:
orbit email-oauth2-proxy --oauth2-client-id <SEU_CLIENT_ID> --oauth2-client-secret <SEU_CLIENT_SECRET>

- Configuring the email-oauth2-proxy Component: After obtaining the Client ID and Client Secret values, the next step is to configure the senhasegura solution, specifically the email-oauth2-proxy component. To do this, the
senhasegura
-
- SMTP: Configuring the SMTP Service: To configure the SMTP service for the senhasegura solution, follow these steps:
1.1 Open a browser and access the senhasegura solution.
1.2 Go to Settings → Notifications → SMTP Configuration.
1.3 Fill in the fields as indicated.
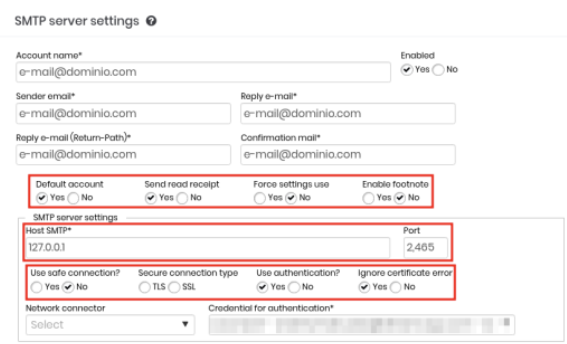
1.4 To save the configurations, click the “Send” button.
1.5 Then, test the SMTP server using the “Test Settings” option located on the SMTP configuration screen.
- SMTP: Configuring the SMTP Service: To configure the SMTP service for the senhasegura solution, follow these steps:
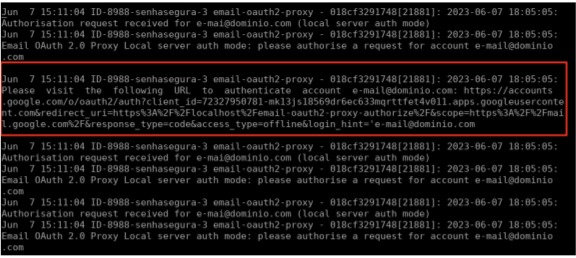
After configuring and testing the SMTP, execute the orbit command on the senhasegura solution’s terminal with the email-oauth2-proxy logs parameter to obtain the URL for authorizing the email-oauth2-proxy component with the Google Mail API.
-
- Authentication and Authorization Process: After obtaining the authorization URL, the next step is to authorize the email-oauth2-proxy component with the Google Mail API. Follow these steps to complete the authorization:
2.1 Open a browser and paste the authorization URL.
2.2 Log in using your Google credentials.
2.3 Grant the requested permissions for email-oauth2-proxy access.
2.4 After authorization, a URL will be generated.

2.5 Replace “localhost” in the URL with the IP address of the senhasegura solution.

2.6 Verify that the final message indicates successful authentication.

- Authentication and Authorization Process: After obtaining the authorization URL, the next step is to authorize the email-oauth2-proxy component with the Google Mail API. Follow these steps to complete the authorization:
These steps will ensure that the email-oauth2-proxy component is authorized to access the Google Mail API.
- Configuring the IMAP Protocol
3.1 Access the senhasegura solution.
3.2 Go to Settings → Notifications → IMAP Configuration/POP3.
3.3 Click “New” to configure a new IMAP server.
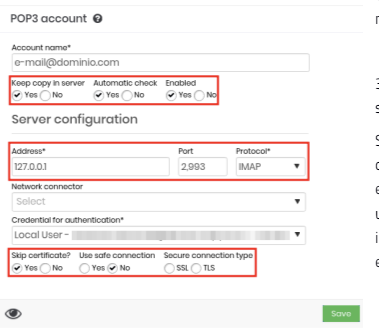
3.4 Enter the necessary server information and click “Save”.
By following these steps, you will have configured and authenticated the email-oauth2-proxy component of the senhasegura solution using the Google Mail API, ensuring the necessary integration for secure and efficient functionality.