Purpose
The purpose of this document is to provide a step-by-step guide on how to use rsync in senhasegura backups.
This document will show how to setup the device that will receive senhasegura backup files and how to setup system and credential backups in senhasegura using rsync.
1. Device that will receive senhasegura backup files
Attention: The device that will receive senhasegura backup files should have the same size of /var partition of senhasegura instances!
1.1 Create a credential on the device
Use the command:
# adduser <rsync_credential>
1.2 Create a directory with permissions to the credential created on the device
Use the command:
# install -d <directory> -o <rsync_credential> -g <rsync_credential_group>
1.3 Impersonate the credential and create the authorized keys with senhasegura
root public key
On senhasegura instance, verify the content of root public key using the command:
# cat /root/.ssh/id_rsa.pub
ssh-rsa
AAAAB3NzaC1yc2EAAAADAQABAAABAQCWqr3mehoVnx2liB5vGFNNtTDdwSYaYW/WQ8NC0yq70BxcmaQW
wFddWfQIQVjMw2WZNkroTsinEZkLHBUN12eMMwNB4izo0iQ70IB8wSj2lQbl/GAYyzQCZQRo486eFHFJVIaTviD
pf32D/O6qz6JGvCpRRzx7owZhuscJGfUesl/q0sCZ9DUn79TLtj/lIC+na4s5c1g/SYyO/DKhuGFRsMJcxFw7y+oE
hoJ8fCozWPKtV+v5hFS9x6Pr7DEIIEHclg5tBxmt9UQ2yRXu1GbkbdFF5tllNdUfgy4Eb7K8kCTm/djb1ljzWiZodtza
s+gPWZOHWaV8nAl17Zc1+xeL shbupk
Use the commands:
# su <rsync_credential>
# mkdir /home/<rsync_credential>/.ssh
# vim /home/<rsync_credential>/.ssh/authorized_keys
Copy the contents of root public key to this file and save it.
1.4 Install rsync utility on the device
Use the command:
# apt-get install rsync
2. senhasegura system and recordings backup setup
2.1 Access the senhasegura web interface to do the backup settings
Access the menu: 1. Orbit > 2. Settings > 3. Backup

4. Enable application backup: Yes
5. Enable sessions file backup: Optional
6. Mount a remote partition: Yes
7. How will the how to send the backup files: Send to a remote Linux server (via rsync)
8. User: use the credential created on step 1.1
9. Server: use the device IP that will receive senhasegura files
10. Remote path: use the full path of the directory created on the step 1.2
11. Save the settings.
2.2 Test the backup creation
On senhasegura instance, use the commands:
# orbit backup create
Validate on the device directory that the senhasegura backup files was successfully created.
2.3 Backup Logs in senhasegura
# tail -f /var/log/orbinibkp.log
3. senhasegura credentials backup setup
Attention: The master key should be set before proceed with any credential backup setup.
3.1 Create the device that will receive the backup in senhasegura
Access the menu: Devices > Devices and register the device that will receive the backup in senhasegura.
3.2 Create the credential of the device that will receive the backup in senhasegura
Access the menu: PAM Core > Credentials > All and register the credential associated with the device that will receive the backup in senhasegura.
3.3 Access the senhasegura web interface to do the backup settings
Access the menu:
- Orbit > 2. Settings > 3. Backup
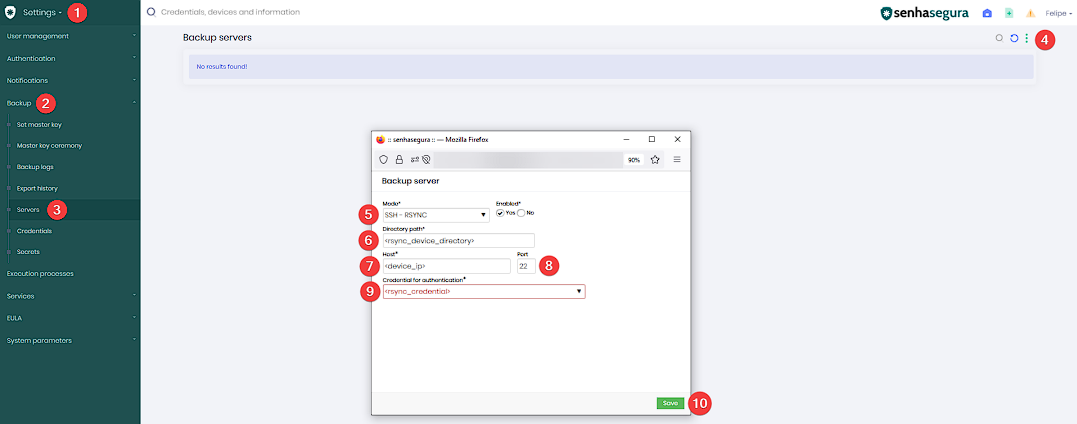
4. Click on the 3 dots and add a new configuration
5. Mode: SSH - RSYNC
6. Directory path: <rsync_device_directory>/secrets
7. Host: <device_ip>
8. Port: 22 (or any other SSH port accepted by the device)
9. Credential for authentication: Select the credential created at the step 3.2
3.4 Test the backup creation
On senhasegura web interface, request a password change or change a credential manually, to a credential backup be triggered. Validate on the device directory that the senhasegura backup files was successfully created.