Creating a certificate key
In this case, we are creating an AES256 key with 2048 bits with a password to later be used in a certificate.
Creating the key for the server and entering a password for the certificate
openssl genrsa -aes256 -out Certificate'sName.key 2048
You will be prompted to create a password for the certificate. Then confirm the created password.
Remark: To generate or convert a new passwordless key, see the Extras section in the final article.
A .key file will be created in the folder where the command was executed or in the indicated folder of the command, if it uses a path in its execution.
![]() ATTENTION
ATTENTION
DO NOT GENERATE CERTIFICATE WITHOUT SUBJECT ALTERNATIVE NAME
Proceed to the session: Command for generating CSR with subject alternative name
Command for generating CSR with subject alternative name with a previously generated key
To generate a CSR using a key previously (with or without a password):
openssl req -new -sha256 -nodes -out [Certificate'sName].csr -key [Certificate key name].key -config <(
cat <<-EOF
[req]
default_bits = 2048
prompt = no
default_md = sha256
req_extensions = req_ext
distinguished_name = dn

[ dn ]
C=[insert country]                       #  two letters acronym
ST=[insert state/province]
L=[insert city]
O=[insert organization'sName]
CN = [insert Login url]

[ req_ext ]
subjectAltName = @alt_names

[ alt_names ]
DNS.1 = [insert domain's name]
DNS.2 = [insert domain's name 2, if it exists]
DNS.3 = [insert domain's name 3, if it exists]
DNS.4 = [insert domain's name 4, if it exists]
DNS.5 = [insert domain's name 5, if it exists]
EOF
)
Command for generating CSR with subject alternative name and a new key
To generate a CSR and a new passwordless key:
openssl req -new -sha256 -nodes -out [Nome do certificado].csr -newkey rsa:2048 -keyout [Nome da chave do certificado].key -config <(
cat <<-EOF
[req]
default_bits = 2048
prompt = no
default_md = sha256
req_extensions = req_ext
distinguished_name = dn

[ dn ]
C=[insert country]                       #  two letters acronym
ST=[insert state/province]
L=[insert city]
O=[insert organization's name]
CN = [insert Login_url]


[ req_ext ]
subjectAltName = @alt_names

[ alt_names ]
DNS.1 = [inserir nome do dominio]
DNS.2 = [insert domain's name 2, if it exists]
DNS.3 = [insert domain's name 3, if it exists]
DNS.4 = [insert domain's name 4, if it exists]
DNS.5 = [insert domain's name 5, if it exists]
EOF
)
Creating the .crt file from the .csr signature request
This command signs the certificate with a previously created key, use it to generate a self-signed certificate. A self-signed certificate is not secure because it is not signed by a recognized CA.
![]() Remark: The self-signed certificate will always be identified as unsafe by the browser.
Remark: The self-signed certificate will always be identified as unsafe by the browser.
openssl x509 -in NomeDoCertificado.csr -out NomeDoCertificado.crt -req -signkey NomeDoCertificado.key -days 365
Installing the certificate on the Nginx server
Remark: Check if you can install the certificate via Orbit before proceeding.
The certificate installation must be performed via Orbit before attempting to perform via terminal.
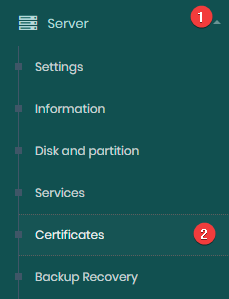
Access Orbit > Servidor > Certificates.
On the screen that appears, click on “Choose file” to select the .crt file and the .key.
![]() Attention: Make sure the files are not UTF-8 with BOM (Byte Order Mark) encoded.
Attention: Make sure the files are not UTF-8 with BOM (Byte Order Mark) encoded.
Then, click in Import.

Wait for the certificate to be installed.
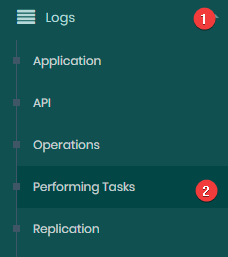
It is possible to follow the execution of the task in Logs > Performing Tasks.
Manual certificate installation
It is necessary to copy the files signed by the certifying entity to the senhasegura server in the folder /etc/ssl/localcerts/ through the command:
![]() Attention: Make sure the new file names are different from the files in the folder where they are being copied.
Attention: Make sure the new file names are different from the files in the folder where they are being copied.
cp [certificate file] /etc/ssl/localcerts/
cp [key file] /etc/ssl/localcerts/
Open the file /etc/nginx/sites-enabled/senhasegura with the command:
vim /etc/nginx/sites-enabled/senhasegura
Comment the following lines:
ssl_certificate /etc/ssl/localcerts/ss-self.bundle.crt;
ssl_certificate_key /etc/ssl/localcerts/ss-self.key;
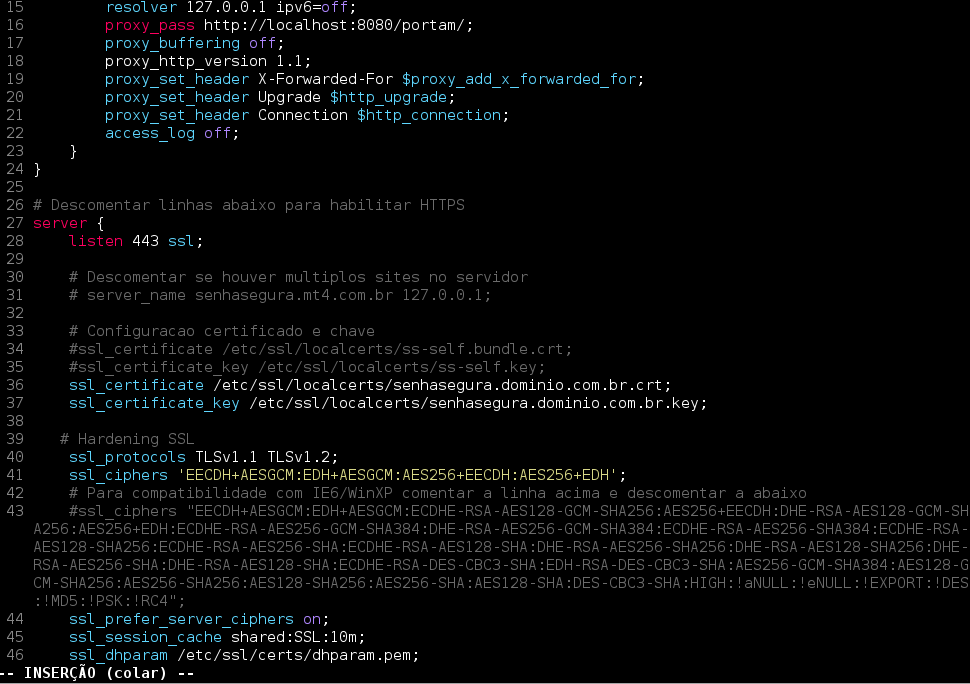
After commenting the lines above, which refer to the current certificate, create two equal lines with the path of the new certificate, as shown in the figure below:
ssl_certificate /etc/ssl/localcerts/NomeDoCertificado.crt;
ssl_certificate_key /etc/ssl/localcerts/NomeDoCertificado.key;
Test the config file syntax:
service nginx configtest
Restart Nginx Server:
service nginx restart
Check its status with the command:
service nginx status
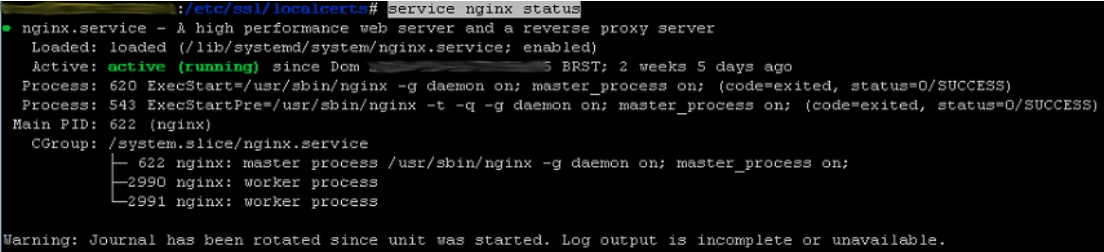
If the service status is active (running), the service is working properly.
Then, enter the address of the senhasegura application in the browser and validate that the new certificate has been recognized.
Extras
Removing the password from a key:
openssl rsa -in CertificateNameWithPassword.key -out CertificateNameNoPassword.key
Checking the certificate key information:
openssl rsa -noout -text -in senhasegura.dominio.com.br.key
For automatic redirection from HTTP to HTTPS, uncomment the /etc/nginx/sites-enabled/senhasegura file:
if ($remote_addr != '127.0.0.1') {
return 301 https://$http_host$request_uri
}
Verifying subscription request information:
openssl req -noout -text -in senhasegura.dominio.com.br.csr
Commands for Testing Certificates
openssl rsa -noout -text -in certificate.key
openssl req -noout -text -in certificate.csr
openssl x509 -noout -text -in certificate.crt
Check do MD5 checksum:
Use to validate that the certificate matches the key.
Remark: The command output must be the same in both commands.
openssl x509 -noout -modulus -in certificate.crt | openssl md5
openssl rsa -noout -modulus -in certificate.key | openssl md5
openssl req -noout -modulus -in certificate.csr | openssl md5
Certificate Bundle:
cat certificado.crt bundle.ca-bundle >> certificado-bundle.crt
Certificate conversion
x509 to PEM:
# openssl x509 -in certificate.cer -outform PEM -out certificate.pem
PEM to DER:
# openssl x509 -outform der -in certificatename.pem -out certificatename.der
DER to PEM:
# openssl x509 -inform der -in certificatename.der -out certificatename.pem
PEM to P7B:
# openssl crl2pkcs7 -nocrl -certfile certificatename.pem -out certificatename.p7b -certfile CACert.cer
PKCS7 to PEM:
# openssl pkcs7 -print_certs -in certificatename.p7b -out certificatename.pem
PFX to PEM:
# openssl pkcs12 -in certificatename.pfx -out certificatename.pem
PFX to PKCS:
Convert PFX to PEM
# openssl pkcs12 -in certificatename.pfx -nocerts -nodes -out certificatename.pem
Convert PEM to PKCS8
# openSSL pkcs8 -in certificatename.pem -topk8 -nocrypt -out certificatename.pk8
P7B to PFX:
Convert P7B to CER
# openssl pkcs7 -print_certs -in certificatename.p7b -out certificatename.cer
Convert CER and private key to PFX
# openssl pkcs12 -export -in certificatename.cer -inkey privateKey.key -out certificatename.pfx -certfile cacert.cer
PEM to CER:
openssl x509 -inform PEM -in cacert.pem -outform DER -out certificate.cer
CER to CRT:
openssl x509 -inform DER -in certificate.cer -out certificate.crt
PEM to KEY
openssl rsa -in certificatename.pem -out certificatename.key